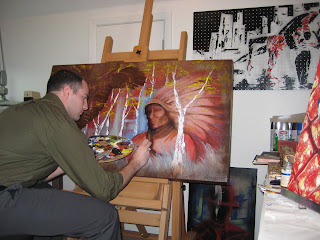
This painting, Legend, was commissioned by Dr. Garry M. who taught my Horticulture lab several years ago. I had been wanting to breaking into this new style of mixing realistic oil painting with more impressionistic spray paint and acrylic. Garry expressed interest in the impressionistic forest paintings I had done. I later found out about his Native American ancestry and I asked if I could incorporate that into the painting, and if I could try out this new style. This piece turned out to be a perfect subject matter for trying out the new technique. The realistic portrait fused with the rest of the painting so much better than I ever could have expected.
The message I wanted to portray through the painting is mans' interdependent relationship with nature. Native American religious ideas are built upon this relationship. I felt it appropriate to use the eagle as an animistic icon of the free spirit. The portrait is of Wokova, a Northern Paiute Native American medicine man. After a prophetic vision during the solar eclipse on Jan 1, 1889 he founded the Ghost Dance. His life story, and introspective gaze seemed to meld seamlessly with the forest. Ironically his name means "wood cutter"...
My favorite poem by Robert Frost is Into My Own. This poem was in the back of my mine while painting this piece. I encourage you to google it and read it as it will help you understand the painting's meaning better than I can explain it.
Since I knew this painting would be a monumental new style for me I documented the process from the start. Now I'll tell you how I did it all!

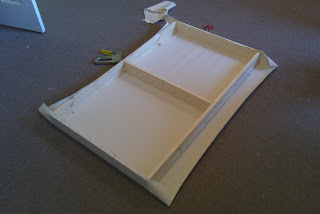
First, I stretched the canvas. Canvas rolls are about $60 and in the long run it saves tons of dough. I made the frame with pine 1X4s which were wood glued/nailed together. I use a hand saw for the cut because I loose a 1/16 inch if I use my circular saw. If you use a miter box it will help to get a 90 degree cut. Anyway, then I cut the canvas. Cut 4" extra on the width and height. This ensures you don't under cut, and it gives something to pull and stretch by. I start stapling (use the big 17/32" staples) from the center to the corners. If you start at the corners the canvas pulls unevenly and the frame won't be square afterward. To finish it just fold the corners in and trim the excess off.

Next comes the Gesso, or canvas primer. I position the canvas in front of a window because the light doesn't show through the primed areas and you can see spots you miss. Don't buy the expensive art gesso brushes just get whatever from a hardware store.

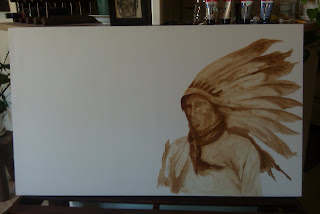
This was the time consuming stage that I won't teach you because there are so many books that can do a better job; rather I'll just tell you about it...First, I penciled an outline based on the picture of Wokova. Next I used brown oil paints mixed with an oil painting medium which increases flow and dry time. Then I painted layer after layer working light to dark. Oil can be a messy and time consuming business. I work left to right so I don't smear my work, and I buy cheap brushes because you can really only clean them 5 or so times before you just need to chunk them in the trash.

Here's a close up. The blue is acrylic which I painted around the border of the figure. I did this for the contrast, and because I was about to use spray paint for the background and wanted to define the edge beforehand.


The goal with this acrylic was to make the center of the painting lighter in tone than the rest of the painting. Although the portrait is the focal point of the painting I wanted the eye to be drawn to the middle of the piece, and down the pathway through the grass.

I was terrified at this point in the painting... I really liked the blue and gray colors above and it was a huge transition to the red spray paint background. I had to keep the end product in mind though and convince myself that it would work out. I was really happy with how the red faded into the light tan of Wokova's shirt. This worked out better than I expected.

Next I beefed up the oil layers, painted the white trees, and put an additional layer of blues and grays. I zoomed in on this to show how the blue defines the portrait. If you look close at paintings, even by the masters, you will see that the background has a final layer that is actually painted after the foreground. This is because the background is often darker or thicker paint. So if you look closely you will see a borderline along the edge of the foreground subject. I tried hard to eliminate this in my piece; "a masterpiece shows no brush strokes" right?... My intent was to control the dichotomy of the impressionist "sho yo strokes" attitude, and the traditional mannerist perfectionist. Whatever, it's just a bunch of art b.s. anyway.

The larger view.

I took this in B&W because it shows the contrast and tones of the color. As I paint I often step away to get the big picture. I'll also squint my eyes which blocks out detail and helps me to see contrast. The eagle was done in spray paint. This gives the transparent effect that I was hoping to achieve. To do this I used a stencil. I'm sure you thinking "Stencil?! Thats freakin' cheating". And I assure you that after going through the trouble of sketching/cutting out a stencil this size with a puny exacto you will regard it as a technique and not a short cut. Keep in mind that, although art technique is hard to perfect, it is done through simple steps and processes. Even masters like Rodin had tricks of the trade when carving big rocks. Anyway, after the spray paint I darkened the edge of the eagle with oil paint.

These are the final touches which always take forever. "The devil is in the details". After the details I used brown spray paint to create a faded border around the painting. This is a little tricky if you don't play with spray much. You can buy different spray tips for cans to allow for better spray control. If you ever use spray paint on a painting wipe the painting down the next day with a slightly damp cloth to get the spray dust off. This makes the world of difference. Lastly, I signed and varnished the painting. This completes the painting 101 breakdown. Please feel free to leave comments below. Cheers!

Will! This is an awesome painting! I love how you explained each step, the reason behind it, and tricks of the trade. I've been dabbling in some painting myself and haven't thought about mixing the medias with spray paint...fascinating! I really like the final product's unique character, especially after I heard the beginning story from you in person a month ago and could tell how excited you were about it. Way to go friend; it looks great!
ReplyDeleteWow! You are such a talented artist! I'm so impressed. Keep it up and thanks for sharing!!!
ReplyDeleteThanks for the comments! Adrienne, you should definitely try out the spray paint. It's a fun medium. You will have a love-hate relationship with it until you get the can control figured out. I've already got a new piece in mind using this technique. I've got another commission to do first, and then I'll spill the beans. Cheers!
ReplyDeleteBaller
ReplyDeleteGreat work. I always like to see the process, so I am glad you showed it.
ReplyDeleteCheers Jacob! Yeah, showing the process might take away some of the mysticism but I think it's good to reveal what's behind the curtain.
ReplyDelete